Mailing Lists♯

The Drexel IT Mailing List team manages a University-wide mailing list server running the venerable LISTSERV software. CTS maintains a number of lists for each department's faculty, staff, and student populations as well as other college-wide lists.
List Membership Policies♯
Because these lists are used for sending facilities notices and other important announcements affecting the College of Engineering community, we are unable to accept requests from students to be removed from lists they're automatically members of.
Requesting a New List♯
Please contact us to have a new list created. Before submitting your request, please review the existing lists to verify that the list being requested does not already exist.
Instructions for Sending♯
Finding List Addresses♯
The addresses for each list are available to faculty and staff via Excel files hosted in SharePoint. The lists are organized in spreadsheets by department, with information about who the list admins and moderators are, as well as whether the list is automatically or manually populated.
Sending to @lists.drexel.edu Lists♯
Once you've found the correct list address, simply send an email to that address. If you are a member of a group that's auto-approved to send to the list, you should receive a confirmation email that your message has been delivered. If you are sending to a moderated list, you will receive a confirmation email that your message is awaiting moderation, and then another message when it's finally approved.
Please note that mailing list messages are limited to 10MB in size. This includes the message itself as well as any attachments, so the attachment size limit is actually a little smaller (slightly more than 8MB in our tests). If you need to send larger files, it’s recommended that you share it via a link using OneDrive.
If you are sending to a list that you are also a member of, you will not receive a copy of the email you've sent (unless you sent it from a different address than what is subscribed to the list).
Errors, Bounce-backs, and Other Issues♯
We've noticed that, even for auto-populated lists, sometimes delivery errors occur. If you receive an error email (usually with error report from LISTS.DREXEL.EDU in the subject line), please review the attached error message. The most common error is that delivery to a single address failed -- if you see this, then your message has successfully gone out to the entire list except for the address listed.
If you send to the lists on a regular basis and receive these emails, you may wish to create a rule in Outlook to divert messages with a subject containing error report from into a separate folder.
If you'd like, you can forward errors to us at coe.helpdesk@drexel.edu and we can reach out to the Mailing List team to try to resolve the issue.
Issues with Auto-Populated Lists
If a student is not receiving emails from a list (or is receiving emails from the wrong list), then the issue is most likely related to how the student is registered in Banner. Please review the student's registration data for any inconsistencies.
Automatic vs Manual Lists♯
LISTSERV is connected to a database of student and employee email addresses that are updated automatically from the various registration and HR systems. The College-wide faculty, staff, and student lists are automatically pulled from these sources, as are most of the departmental grad and undergrad lists, with the exception of most individual undergraduate year lists (as class year data is based on credit-hours and routinely mischaracterizes students actual class year). Please note that this data may include accepted students who have not yet picked up their accounts, even though their addresses are on the lists. Please refer to the section on Errors and Bounce-backs if you’re receiving errors.
Instructions For List Managers♯
First Time Logging into Lists.Drexel.edu♯
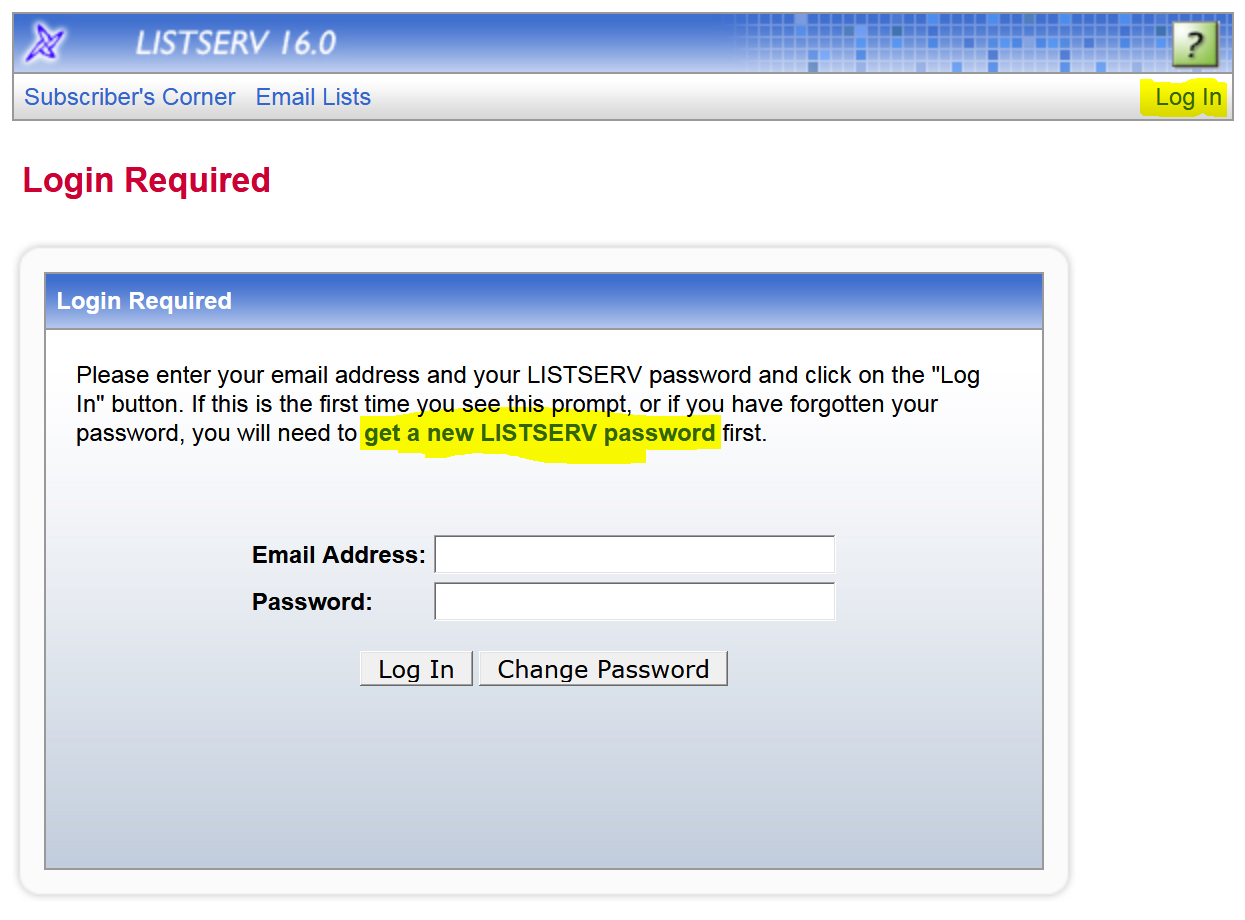
Start by visiting //lists.drexel.edu and clicking on the Log In link to the right hand side of the site header. Once you’re at the login page, click the link titled get a new LISTSERV password.
Enter your Drexel email (in the abc123@drexel.edu format) and choose a password. This server is NOT attached to your drexel.edu domain account, so your password can (and should) be different.
Once you click Register Password, you should receive a confirmation email to the email account you entered with a link you need to click to confirm your account. Once that’s done, you can log in using the email and password you just registered with.
Checking Your List’s Subscribed Members♯
To see who’s subscribed to a list, in the top menu, click List Management -> Subscriber Reports. You’ll then be presented with a dropdown of the mailing lists that you’re an owner for – choose the list you’d like to view. Once you select the list, the page will reload and show you a table of all manually added email addresses.
If your list is manually populated, you may not see any email addresses listed here. Instead, click on LISTSERV Command and under Sample Commands, click Review {List}.
If you see 0 subscribers (or fewer than you expected), but there's a number listed next to Number of sub-lists, add a space and the letters RCPT to the end of the textbox next to New Command, then click Submit. This will cause the mailing list software to run the queries against the database and show the actual list of auto-populated members.
Adding / Updating List Members♯
Users can be added via the List Management -> Subscriber Management page. Under Search for Subscribers, you can enter an email address (or part of an address) to make changes to the user (most likely to remove them from a list). In the blue box below the search area, you can add new email addresses to the list (or, if you prefer to include the subscriber's name as well, enter it in either of the formats listed).
@drexel.edu email addresses should be used for all official communications. For group collaboration lists, external email addresses may be used when required.
If you're only using the lists for sending information and do not want the list subscribers to be able to reply back to the entire list, then please use the long format email addresses (e.g. first.middle.last@drexel.edu). Because the Office365 accounts send as the user's abc123@drexel.edu address, the messages will not automatically go through and will instead trigger a moderation request which can then be denied or approved.
For bulk actions, go to the Subscriber Reports page and click Bulk Operations next to the Add Subscriber heading. There, you can add new addresses to the list without affecting the current members (1st option) or clear the list and add new members (2nd option). You can clear a list without adding new members by selecting the 2nd option and not providing a text file. The individual addresses in the text file should match the formats listed below.
If you're exporting the information from Excel, please save a single-column list of email addresses with no header as either a CSV (comma seperated values) or TXT (text) file.
Acceptable line formats are:
email@address
email@address firstname lastname
firstname lastname <email@address>
Moderating List Messages♯
All of the departmental lists are set to automatically accept messages from that department’s faculty and staff email addresses, bypassing the approval process. Any messages sent from addresses that aren’t included on those lists will be held for moderation.
The list moderators are listed in the shared Excel documents (via OneDrive) in the same folder as this document.
Updating List Admins/Moderators & Adding Auto-Approved Senders♯
LISTSERV uses the a few terms that are helpful in configuring management access:
- The Editor keyword determines who is allowed to send to a list without moderation. All departments by default have their staff and faculty lists added to the Editor group.
- The Moderator keyword determines who receives a notification to approve an email held for moderation.
- The Owner keyword determines who is able to edit the list’s overall configuration.
To update any of these keywords, choose the list from the drop-down, and then click List Management -> List Configuration Wizard, and then click to the List Maintenance tab. You can add or update individual email addresses in any of the 3 textboxes, and then click Save.
Removing Users from Auto-populated Lists♯
While there is no way to fully remove someone from an automatically populated list, there is a way to stop emails from being sent to that address.
- Select the list you want to “remove” someone from, and go to Subscriber Management.
- Find the exact email address you want to remove by following the instructions above for Checking Your Lists’s Subscribed Members
- Under Add New Subscriber, add the email address you want to remove. Choose Do Not Notify the User before clicking Add to {List}
- That email should now appear in the search boxes. Click Search in {List} in the top section, then Examine or Delete Subscription.
- Put a check next to the top list item under Miscellaneous, Mail delivery disabled temporarily [NOMAIL]
- Click Update.
Once this is complete, the user will no longer receive mail sent to this list even though they may continue to be automatically added to the list by the membership script.
Issue with Moderated Messages Auto-Approved when using Web-Based Outlook♯
If you're a list moderator and are checking your email via the Outlook web portal in a browser, the Link Preview feature in Outlook Online may cause the Approval link in any moderation emails you recieve to be automatically clicked, defeating the purpose of allowing the message to be moderated.
To correct this issue, the "Link Preview" option needs to be turned off which you can accomplish by doing the following:
- Log into https://outlook.office.com/
- Click on Settings (the Gear symbol in the upper right of the screen) and click on View all Outlook Settings.
- In the Settings pane, select Mail and then Compose and reply.
- Scroll down to Link preview.
- Under Link preview, clear the Preview links in email check box to turn off Link Preview.
- Exit Settings (there is no "Save" button)
